|
|
 |
Adding New Parts to the MC6 Libraries
There are three broad classes of parts that are typically added to the libraries:
• Primitives: These use model statements and include such parts as diodes, NMOS devices, JFETs, and NPNs.
• Subcircuits: These are text descriptions written in SPICE syntax, usually by part manufacturers, that describe a circuit that models the part.
• Macros: These are Micro-Cap schematics, that describe a circuit that models the part.
To add one of these to the MC6 libraries there are three basic steps:
1) Copy the file containing model information to the data directory:
If the part is a subcircuit or a primitive like an NMOS, copy the file containing the subckt or model statement to the data directory. If the part is a macro, create the macro, label its pins with grid text, and save it to the data directory.
If the model information is a model or subckt statement, the file name should be something like MYFILE.LIB. If the model information is a macro, the file name should be something like MYMACRO.MAC.
The macro file name extension must be either MAC or CIR.
2) If the part is modeled with a subckt or model statement, add the model library file name to the NOM.LIB text file located in the data directory.
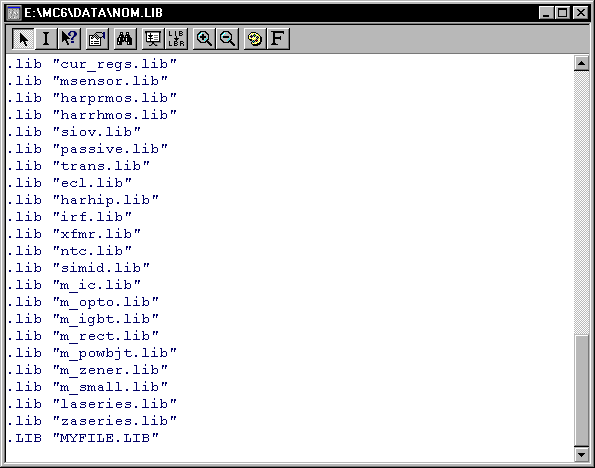
This step is unnecessary if the part is a macro. Using the File menu Open command, open the file NOM.LIB. Add a line in the file that lists your file name .LIB "MYFILE.LIB" like this:
|

|
Close and save the NOM.LIB file. NOM.LIB is a master index file listing all of the files which contain modeling information in the form of model statements, subcircuits, and MC6 binary model libraries (*.LBR).
3) Make an entry in the Component library:
If the new part is a primitive such as an NMOS device, nothing more is necessary. You simply place a generic NMOS in the schematic and select the new model name from the Model list in the Attribute dialog box.
If the part is a subcircuit or a macro, or it is a primitive like NMOS that you want to simply place without specifying its model name, then you must make an entry in the Component library. Here is how you do that:
• Invoke the Component Editor from the Windows menu.
• Pick a location for the new part by clicking on a file name and a group name in the list at right.
You can place the part in any component library file. This includes the original standard.cmp file or any you've have created along the way using the New command. Placing the new part in a small private library file has distinct advantages. When you install a new MC6 software update, the installer renames the standard.cmp file to standard.0 and copies in the new standard.cmp, making your old parts inaccessible. Of course you can always merge the old and new standard files using the Merge command, but it is simpler and cleaner to keep added parts in separate files. All component library files use the extension CMP.
• Click on the Add Component button in the Tool bar below the Component Editor name.
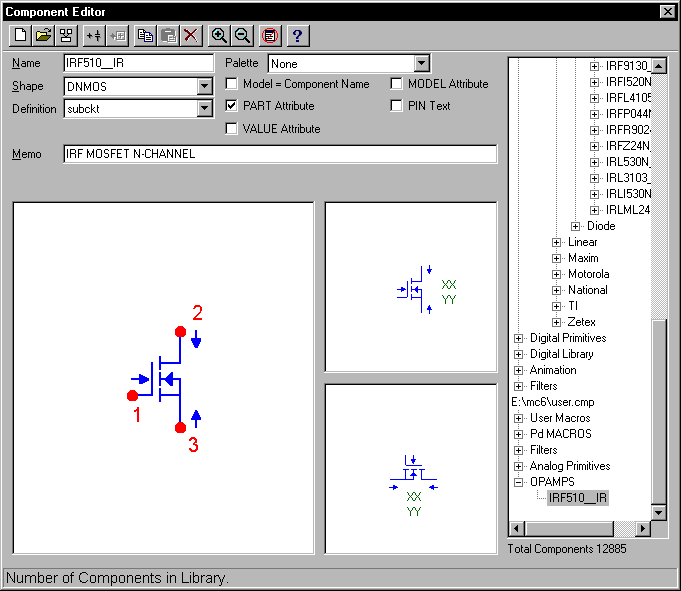
This will add a generic part in the chosen file and group.
|

|
• Name field: If the part is a subckt, use the same name used in the .SUBCKT statement. If the part is a macro, use the same name you saved the macro file under.
• Shape field: Pick an existing shape or one you've created with the Shape Editor.
• Definition field: Specify SUBCKT if the part is a subcircuit, MACRO if the part is a macro, or select the primitive name (such as NMOS) if the part is a primitive.
If the part is a primitive like an NMOS device, the pin names will automatically be entered. You need only drag them into position on the shape. If the part is a macro or a subcircuit, you click in the shape display to enter pins which you name and drag into position on the shape. Subcircuit pin names are usually numbers and must be the same as listed in the .SUBCKT statement. Macro pin names are usually node names that have been labeled with grid text to identify the pins.
If the part is a primitive that you want to simply place by name without having to select its model attribute, enable the Model=Component Name option. When you place a primitive part with this option disabled, the Attribute dialog box appears and you must specify the model name. If the option is enabled, then the model name is assumed to be the part name and no dialog box appears. This simplifies part placement.
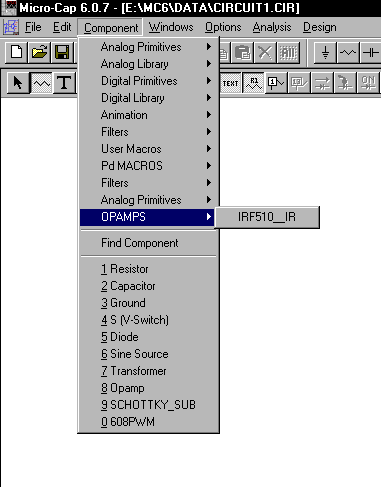
Quit the Component Editor and save the file. The new part will now appear on the Component menu in the same hierarchial group where it was placed. If you can't remember where you placed it, get some ginseng root extract. They say it's good for your memory. Seriously, if you do forget, the Find Component search command on the Component menu will let you locate it even if you can only remember the first few characters of its name. Once located, you can place it in a schematic, or open the Component Editor and you'll see its location in the hierarchy.
|

|
|
|
|
|


