|
|
 |
Upgrading to Micro-Cap 8
When upgrading to a new version of Micro-Cap, the user will typically want to import
data from their previous version of Micro-Cap. The type of data may consist of files
such as schematics, macro circuits, and libraries, schematic information for components,
shapes, and packages, or user defined settings and preferences. The following sections
will provide tips and methods for how to make a smooth upgrade between versions of
Micro-Cap.
Installation Location
Do not install Micro-Cap 8 in the same folder as the previous version of Micro-Cap.
Install Micro-Cap 8 in a new folder. This folder may be located anywhere on the hard
drive. Installing in the same folder as a previous version could overwrite files that
may still be needed for specific simulations. It may even prevent a user from being able
to run the older version if necessary. Keeping the older version in a separate directory
provides a nice, simple backup as Micro-Cap 8 will convert files to an updated format
when they are loaded in the program.
User Settings
A feature new to Micro-Cap 8 is the Migrate command which is available under the File
menu. The Migrate command provides a means to transfer user settings and preferences
along with component, shape, and package information. Upon selecting this command, the
dialog box below will appear.
|

|
This dialog box will prompt you for the location of the MCAP.DAT file (MC5.DAT if
upgrading from Micro-Cap 5). The MCAP.DAT file will be located in the main directory
of the previous Micro-Cap installation. This file stores general program information
for Micro-Cap including default colors and fonts, Global Setting values, toolbar
settings, Preferences option settings and values, and loaded component and shape
files. Upon hitting the OK button, the information that is applicable to Micro-Cap 8
will be transferred over.
Component, Shape, and Package Information
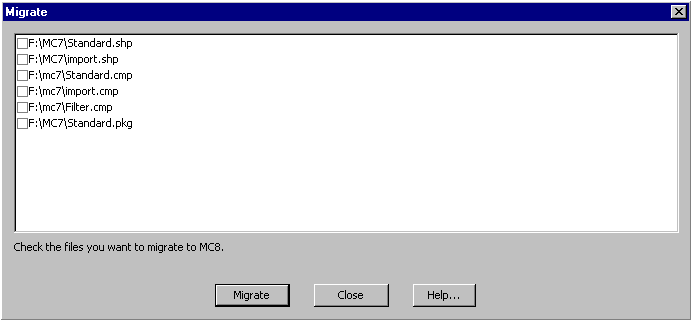
As part of the Migrate command, when the OK button is clicked in the process above, a
new dialog box will be invoked that displays a list of all of the component files
(.CMP), shape files (.SHP), and package files (.PKG) that were loaded in the previous
Micro-Cap version. This dialog box is displayed below. Simply enable the checkbox next
to the file or files that are to be migrated over. Any combination of files may be
selected. If no files are selected, just hit Close to exit the Migrate process and only
the MCAP.DAT information will have been transferred. Once the desired files have been
enabled for migration, hit the Migrate button to start the process.
|

|
If you are migrating component files over to MC8, and have created your own shapes for
these components in the previous version of Micro-Cap, then you must also migrate the
corresponding shape files. Otherwise, the shape that your component references will not
exist in MC8 and you will get a default shape such as a battery. Similarly, when
migrating packages, the corresponding component files also need to be migrated. Once
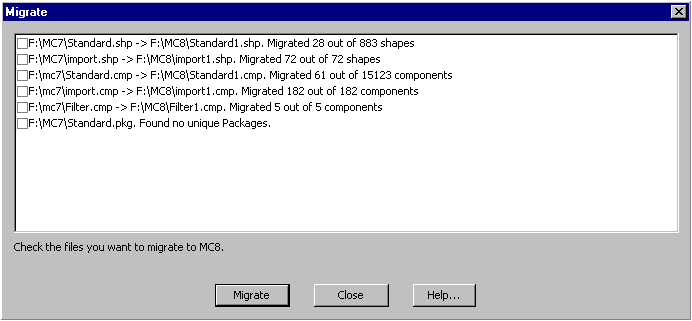
the Migrate button is clicked, each of the enabled files is scanned and any component,
shape, or package that does not exist in Micro-Cap 8 will be imported in. The finished
results of a migration are displayed below.
|

|
The results display the file name and location that the data was transferred to along
with the number of elements that were retrieved from the file. For example, in this
case the Standard.cmp file that was used by MC7 has had 61 of its components transferred
to a Standard1.cmp file that MC8 will access. These components will now be available
for placement in a Micro-Cap 8 schematic. Depending on the group that the migrated
components were stored in for the previous version of Micro-Cap, you may now see
duplicate groups such as Analog Primitives when you click on the Component menu. The
duplication is due to the fact that the migrated components were stored in a separate
.CMP file for Micro-Cap 8, and both the new .CMP file and the Standard.cmp file that
comes with Micro-Cap 8 contain the same group name. The Component Editor can be used
to either rename the group or to move components between groups or files.
Library and Macro Files
While the schematic information for the components are imported into Micro-Cap 8 through
the Migrate command, the underlying simulation models for the components will not be
transferred over in this process. The simulation models are typically stored as macro
circuit files (.MAC) or within library files (.LIB, .LBR). The macro and library files
for Micro-Cap 8 should be stored in the library directory that is specified by the Model
Library field within the Path dialog box which can be invoked by selecting the Paths option
under the File menu. The default library path upon installation will be:
<drive>:\MC8\LIBRARY\
where <drive> is the letter of the hard drive partition that Micro-Cap was installed on.
Any necessary macro and library files should be copied over from the old version into this
library directory of Micro-Cap 8. Be careful not to just copy over all macro and library
files that are in the old version. Doing this may overwrite those files that are installed
with Micro-Cap 8, and many of those files have been updated from previous versions.
Once the macro files have been transferred to the MC8 library directory, they will be
immediately available for simulation. For the library files, one more step needs to be
taken. Each of the transferred libraries needs to have their file names referenced in the
NOM.LIB file. The NOM.LIB file is a text file that resides in the library directory. It
contains a list of all of the library files that Micro-Cap will automatically access. If
a library is not listed in here, Micro-Cap will not be able to locate any of the models
within the library without an explicit reference in the schematic file. To add library
references to this file, open up the NOM.LIB in Micro-Cap 8 or a basic text editor such as
Wordpad. For each library, place a .lib statement on a new line in the file such as:
.lib "myfile.lib"
Once the library is referenced in the NOM.LIB file, any models within the file will now
be available for simulation.
Circuit Files
The circuit files should be transferred over to the data directory of Micro-Cap 8. The
data directory will be specified in the Data field of the Path dialog box. The default
data path upon installation will be:
<drive>:\MC8\DATA\
The conversion of a schematic file to the new Micro-Cap 8 format will occur when the
file is initially loaded into Micro-Cap 8 but will only be permanently converted when
the schematic file is saved. For those users who need to convert a schematic back to
an older format, the File menu contains a Translate option that will let a schematic
file be converted into MC5, MC6, or MC7 format.
User Definitions
The User Definitions are stored in the MCAP.INC file (DEF.MC5 for Micro-Cap 5) that
resides in the main Micro-Cap directory. This file is easily accessible by going to
the Options menu and selecting User Definitions. This file contains user defined command
statements that will automatically be included whenever a simulation is entered.
Typically, the command statements are .define statements but other statements are also
valid. The easiest method for transferring this information is through a copy and paste
operation. Load both the old and new MCAP.INC files in a text editor or their respective
versions of Micro-Cap. Then just copy and paste the information that needs to be
transferred. If none of the command statements in the installed MCAP.INC are of interest,
then the file can also be overwritten.
Miscellaneous Files
There are other files that may need to be brought over to Micro-Cap 8, but that may not
be crucial in running most simulations. These files should be copied to the appropriate
library or data directory. Files such as Model (.MDL) or filter impedance files
(.RES, .IND, .CAP) should be placed in the library directory. Files such as State
Variable (.TOP), S Parameter (.S2P), User Source (.USR), or Digital File Stimulus
files (.STM) should be placed in the data directory.
|
|
|
|
|


