To deactivate old user correction (if available)…
1. Start the CMU and press the Menu Select key after the boot-up sequence is terminated (from the moment when the CMU display turns black until the end of the 3-beep acoustic signal) to activate the VersionManager.
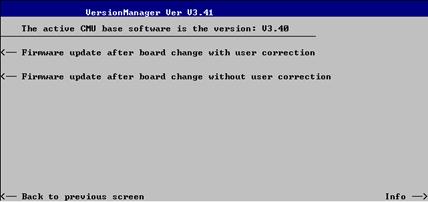
2. Select Firmware update after board change…
3. In the submenu opened, select Firmware update after board change without user correction and Back to previous screen.
The CMU closes the VersionManager and resumes the start-up procedure.
4. Open the Data menu and access the Arrange tab. Delete or rename the old user correction file stored in the directory INTERNAL\USERCOR\USERCOR1.DAT.
5. Press Menu Select to close the Data menu and access the Menu Select menu.
Settings for acquiring correction values
The following settings and precautions will ensure maximum accuracy of the user correction:
6. From the Menu Select menu, access the RF function group or one of the network test options that will be used for the corrected measurements.
7.
In the RF  tab
of the Connection Control menu, select the external input and output
attenuation factors (Ext. Att. Input, Ext. Att. Output) that
will be used for the corrected measurements.
tab
of the Connection Control menu, select the external input and output
attenuation factors (Ext. Att. Input, Ext. Att. Output) that
will be used for the corrected measurements.
8. In the Analyzer tab of the Connection Control menu, select the RF input path attenuation (Analyzer Level – RF Attenuation: Normal, Low Noise or Low distortion) that will be used for the corrected measurements and set the RF Mode to Manual.
Note: The CMU provides a various mechanisms for automatic input level control, e.g. the Analyzer Level – RF Modes Auto (autoranging) and PCL (in GSM-MS networks). To avoid unexpected effects, it is recommended to deactivate these control mechanisms and always measure the correction values at constant (Manual) maximum input level.
To acquire the input correction values…
9. Apply the RF output signal of an external signal generator to one of the RF input connectors RF1, RF2, or RF4 IN of the CMU using the test setup (cables, power splitters, antenna coupler…) that will be used for the corrected measurements.
10. Vary the level and frequency of the signal generator and calculate the correction values as the difference between the external generator level and the measurement result at the CMU. If necessary, adapt the external input attenuation (see step 7) to force the correction values into the allowed range of [–1.2 dB, +1.2 dB].
To acquire the output correction values…
11. Apply the RF generator signal of the CMU to one of the RF output connectors RF1, RF2, or RF3 OUT of the CMU and feed it to a power meter, using the test setup (cables, power splitters, antenna coupler…) that will be used for the corrected measurements.
12. Vary the level and frequency of the CMU generator signal and calculate the correction values as the difference between the generator level and the measurement result at the external power meter. If necessary, adapt the external output attenuation (see step 7) to force the correction values into the allowed range of [–1.2 dB, +1.2 dB].
To activate the user correction…
13. Repeat the steps no. 9 and 11 for all input and output connectors needed and write the acquired correction values into a common file named USERCOR1.DAT with the format specified in section File Format for User Correction Tables.
14. Transfer the file to the CMU using the IEEE bus, the serial interface or the PCMCIA interface and copy it to the directory INTERNAL\USERCOR\.
15. Shutdown and re-start the CMU and press the Menu Select key after the boot-up sequence is terminated (from the moment when the CMU display turns black until the end of the 3-beep acoustic signal) to activate the VersionManager again.
16. Select Firmware update after board change…
17. In the submenu opened (see step no. 3), select Firmware update after board change with user correction.
The CMU checks the file USERCOR1.DAT for compatibility with the file format specification and generates a message, should an error be detected. Afterwards, the CMU closes the VersionManager and resumes the start-up procedure. A message indicates that the user correction is active.
Final test
18. Repeat the steps no. 9 and 11 with active user correction to make sure that the entire procedure was performed without errors.