PC-card
selection dialog:
The PC-card selection dialog selects either PCMCIA card slot 0 (right side) or slot 1 (left side) for installation.
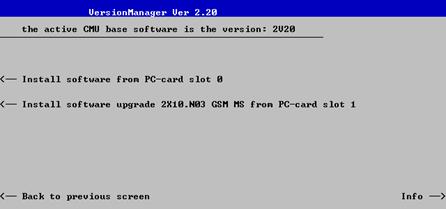
Install software... Select the card in slot 0 or slot 1 as an installation medium. If the medium contains several installation versions, the software version selection dialog is called up, see below.
Software version selection dialog:
The software version selection dialog lists all installation versions on the current medium (floppy, PCMCIA card). The dialog can be operated as explained above; see Activate software.
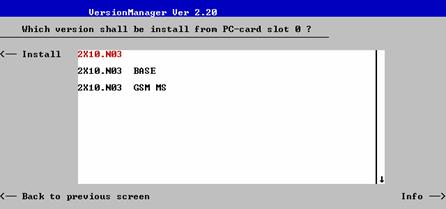
Install Install the current firmware version.
Upgrade options:
In contrast to the Activate software dialog, the software selection dialog handles base software versions and network options separately. As a consequence, different versions of the base software can be combined with different options to create new firmware configurations. For example, it is possible to update the base software without affecting the associated network options or vice versa. Moreover, the same base software version can be installed several times and combined with different network options (and vice versa), so it may enter into several firmware configurations. The following simple rules apply:
· With a new version of a network option, it is only possible to update one of the existing configurations. The following selection dialog is automatically skipped.
· With a new base software version, it is possible to either update an existing configuration or create a new one. A dialog selecting between the two alternatives is opened:
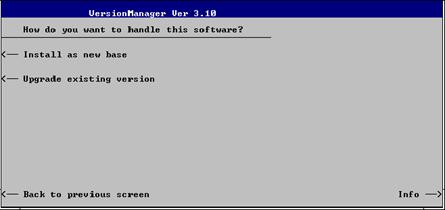
Note: This dialog is skipped if the new base software version is not compatible with any of the existing configurations. An incompatible new base software must be installed as a new base software.
Install as new base Create a new configuration based on the base software to be installed. The upgrade selection dialog described below is skipped. Network options can be assigned to this base software in a second stage of the installation.
Upgrade existing v. Select an existing configuration and replace the base software of this version. To this end, the upgrade selection dialog described below is opened.
Force verm update If the option is checked the current VersionManager is overwritten every time that a new base system is installed, even if this means a downgrade of the VersionManager version. This feature is primarily for service purposes.
After selection of an upgrade software version compatible with one of the configurations stored on the hard disk, the upgrade selection dialog is called up:
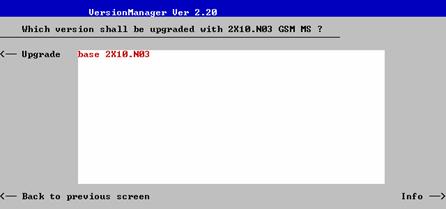
Upgrade Replace the base software version or network option selected in the software version selection dialog.
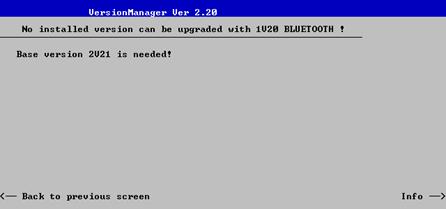
Alternatively, if none of the configurations stored on the hard disk is compatible with the software version selected, an error message is displayed. E.g., for an incompatible Bluetooth version:
Back to... Close the current screen and go back to the software version selection dialog to select a compatible software version.
Terminating the software update:
After successful installation of each software version the CMU displays the following screen:

Install next software... Go back to the software version selection dialog to select additional software modules to be installed in the same VersionManager session. This function depends on the storage media and the number of software installation versions available.
Change disks Update the current screen after a change of the storage medium.
Finish installation Close the VersionManager and reboot the CMU (remove the external disk from the disk drive). The installed firmware configurations are then operational. The last configuration installed is taken as the active configuration in the subsequent measurement session.
Note: Notice messages after firmware updates
In most cases firmware updates don’t affect the accuracy of the measurements. There are some exceptions where a correction procedure must be executed in the Maintenance menu after the firmware update. The R&S® CMU displays a notice message whenever this happens. The box contains the name of the required correction procedure and appears during startup until the correction has been performed.
Lack of disk space:
Before installing the next software version, the CMU checks whether there is enough disk space on the hard disk. If not, the following dialog is displayed:

Delete Delete the current version and return back to the previous screen.